In this tutorial, we will help you to build your own Security Data Lake for most common AWS sources in an hour.
Need for Security Data Lake
Security and data breaches have registered a sharp rise across multiple industries, making it ever more pertinent to adopt and deploy robust and intelligent security solutions with comprehensive coverage. Organizations must collect, analyze and investigate data from as many sources/end points as possible to achieve a safety net against diverse threats. There is a need to centralize data across cloud, on-premise and SaaS environments to perform advanced analytics and deploy requisite solutions to encounter the pace and scale of sophisticated attacks.
The Challenges
Even though the organizations have a choice to do all of the above, they would need a dedicated team, a considerable budget and immense setup efforts to get things started. At the same time, ever-increasing scale of data being generated by large number of endpoints, tools and environments makes attaining this desired state a very cumbersome, time-consuming and highly expensive problem which traditional SIEMs are not equipped to handle.
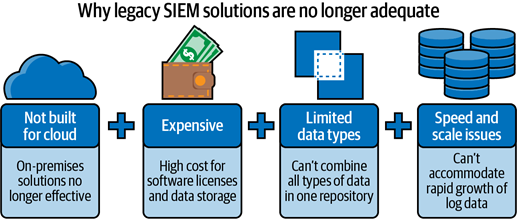
This can be solved by building a Cloud Data Lake in Snowflake.
Prerequisites:
- AWS Account for which you want to collect the log data
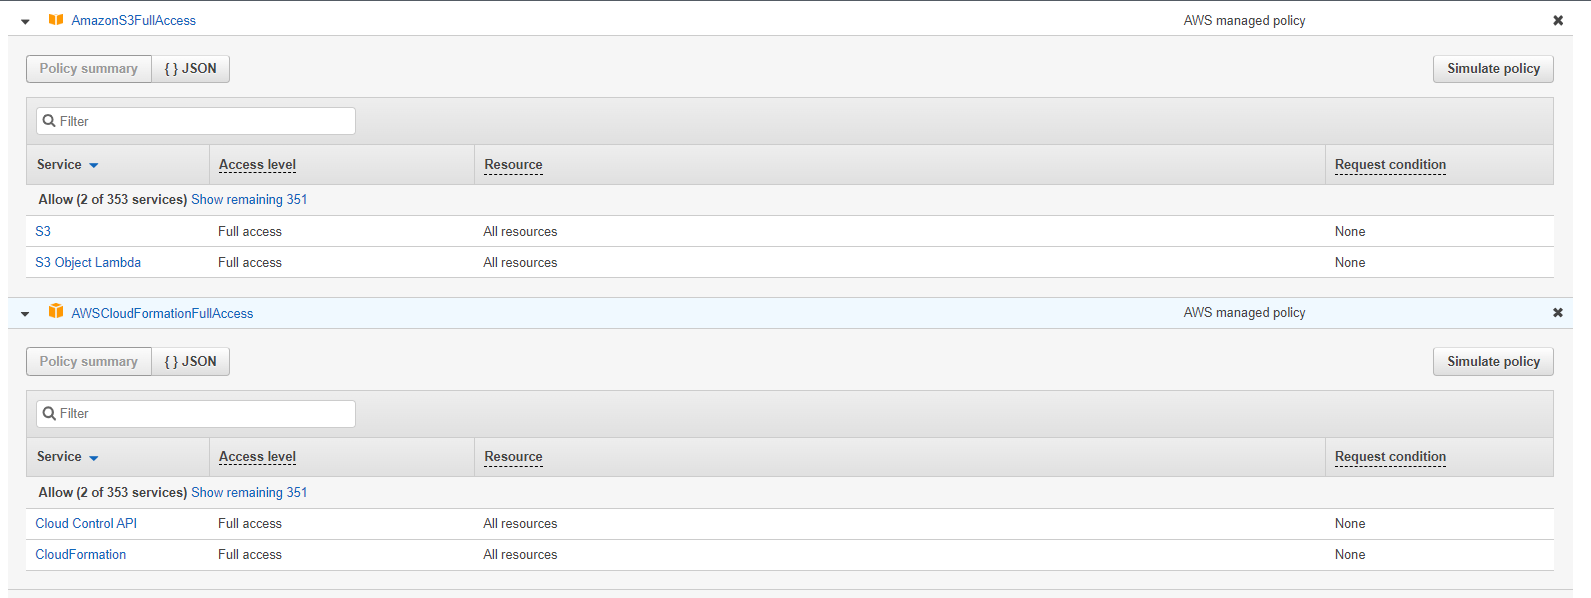
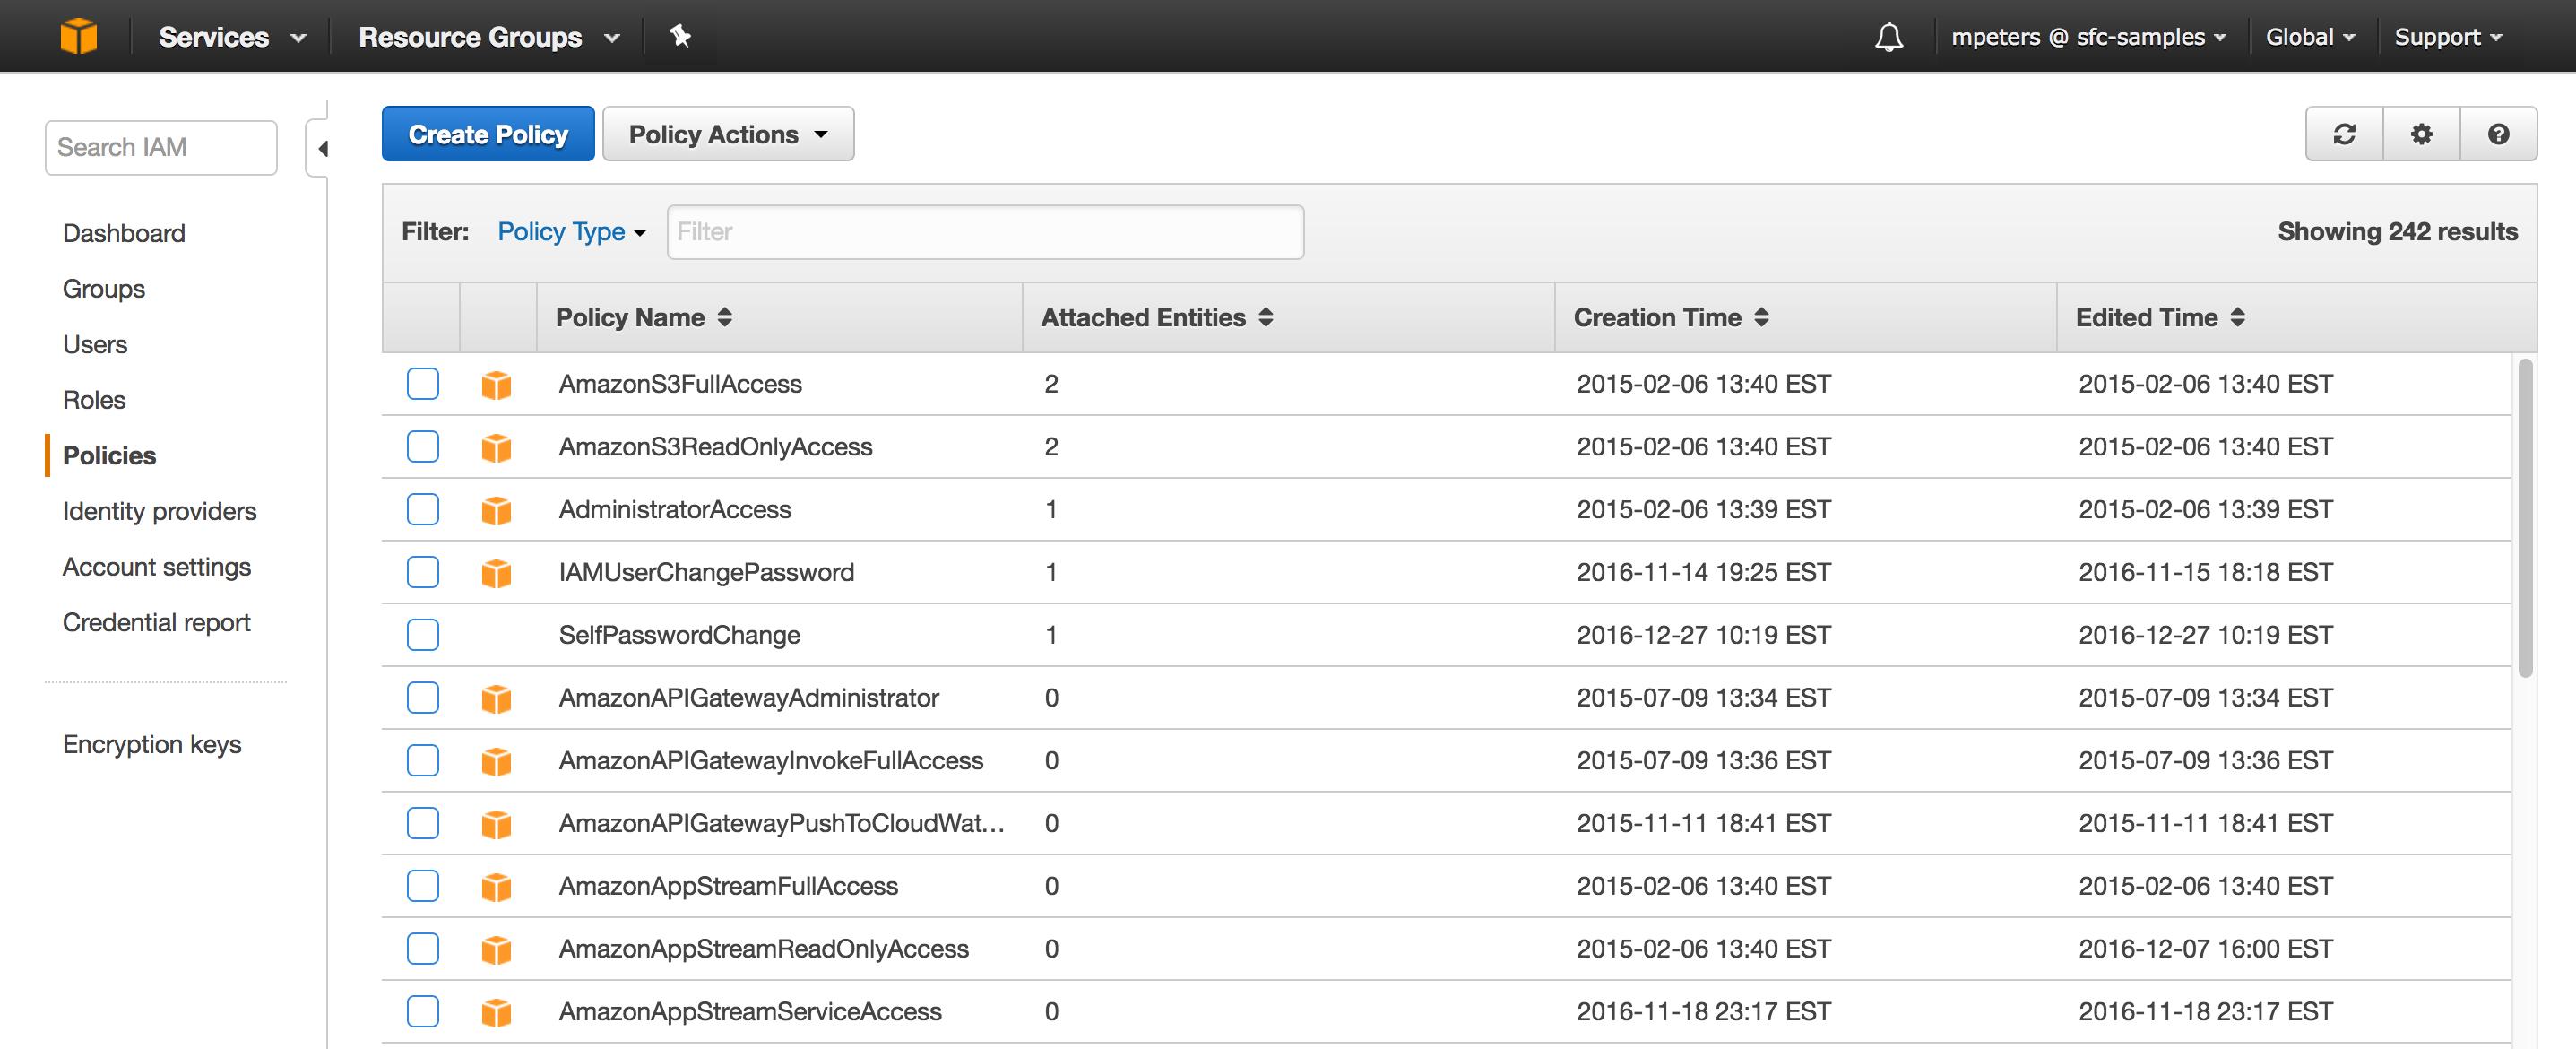
- Privileges necessary to create stack and the IAM grant access to create storage Integration in the AWS account. Please see the image below to see the policies necessary to go ahead with the workshop.
- A Snowflake Account or Free Trial
- Access to BI Tool such as Tableau / Power-BI / Looker
- Basic knowledge of SQL, database concepts, and objects
- Familiarity with CSV comma-delimited files and JSON semi-structured data
- Basic experience using git
What You'll Learn:
- How to set up Log Data extraction/collection in AWS.
- How to set up Log Data loading mechanism from AWS to Snowflake
- How to map log data using standard ODM (Open Data Model by Elysium Analytics)
- How to leverage the insights from the data using dashboards on your preferred BI tool
Approach
Data extraction/collection in AWS
We use a combination of AWS service such as AWS lambda function, S3 bucket, CloudWatch, etc., to set up the data collection process for 5 common security sources (VPC, IAM, S3, EC2 and Guardduty) in AWS. As a result, we collect all the logs in an AWS S3 bucket which Snowflake can consume.
In AWS, you will be creating -
- S3 bucket (to store log files)
- Cloud stack to collect data (includes lambda function, rule in Amazon Event Bridge and a task, etc.)
- IAM policy, a role for Snowflake and AWS storage integration
For your convenience, we have packaged most of the configuration required in an easily deployable cloud formation template. You will find the details on page 4.
Data Ingestion and Data Mapping in Snowflake
We have created a complete mechanism using various snowflake components to consume data logs directly from AWS S3 buckets. Furthermore, we have encapsulated the whole pipeline in an easily deployable SQL file which will set up the complete pipeline. As a result, you will access logs using a Snowflake view built using standard ODM on the raw logs.
Downstream Data Analytics
In this step, we will showcase a few capabilities that can be readily built on the log data for effective analytical monitoring.
We would need an active snowflake account to build our security data lake. You can either use your own active Snowflake or create a 30 days Snowflake free trial within a couple of minutes. This can be easily converted to an enterprise account if desired.
Note:
- Snowflake offers immediate access to its Data Cloud as a 30 days free trial, which includes $400 worth of free credits.
- Snowflake is HIPAA, PCI DSS, SOC 1 and SOC 2 Type 2 compliant, and FedRAMP Authorized, so you can be assured about the security of your log data.
You can now move to the next step, where you will set up a Log Data collection.
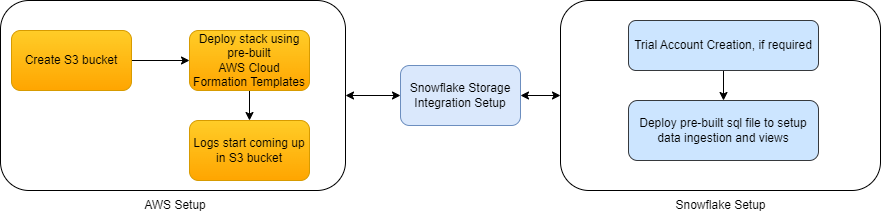
The first step towards creating the Data Lake is setting up the data collection process from various vendors/tools. In this Codelabs, we have documented how it can be done for multiple AWS sources. The overall workflow would be to deploy a cloud stack in AWS for each service to write the data logs in compressed raw files to an S3 bucket.
To ease the process of cloud stack deployment, we have published cloud formation templates that can be accessed from git, which will simplify the whole process with only a few simple parameters needed from your side. The process for each service would be similar, with changes in parameters for some services.
The document below will show how to set up the collection for AWS VPC (virtual private cloud) source. Amazon Virtual Private Cloud is a commercial cloud computing service that provides users with a virtual private cloud by "provisioning a logically isolated section of Amazon Web Services Cloud", and the logs captured contain all the activity on the cloud. First, we will set up the data collection to collect and store the compressed raw files in an S3 bucket.
You can follow the steps below to setup the data collection:
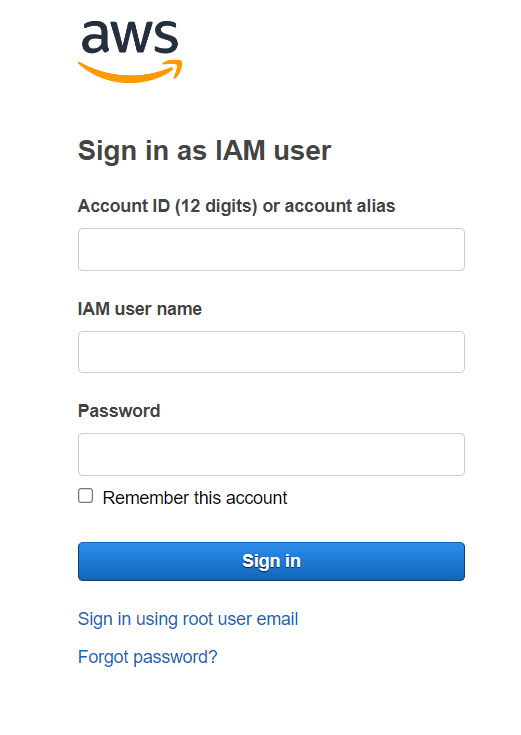
Please login to your AWS console to start up the process.
Step 1: Creating S3 bucket to store log files
You can search "S3" in search box or choose options in the screen to navigate to S3 console.

Please click on the "Create bucket" button to initiate the process of bucket creation.
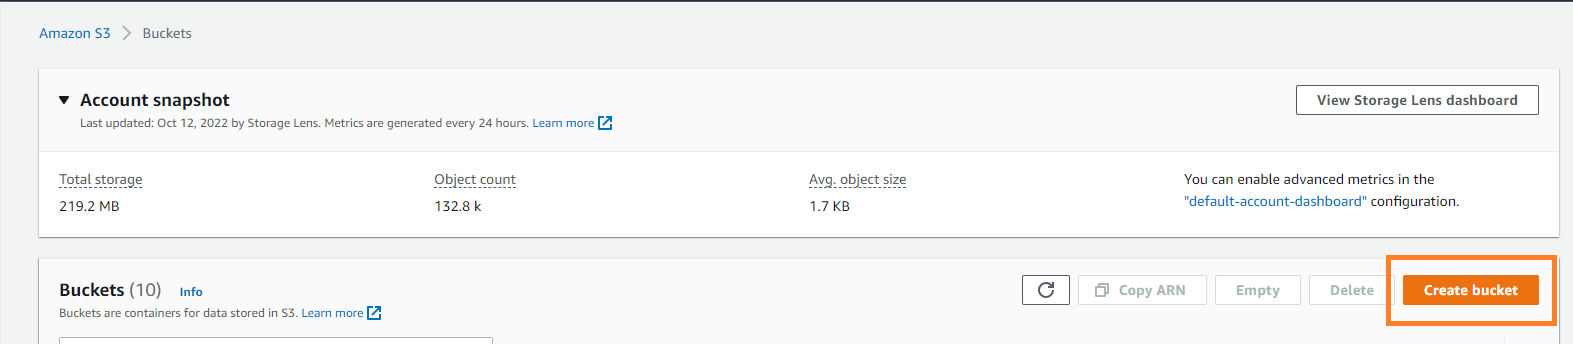
Here you can select the bucket name and the region as per your choice (Our recommendation for bucket name : "cf-sd-aws") and use other standard options to create the bucket.

Step 2 : Cloud stack to collect data
We need to create a cloud stack for the whole collection pipeline in AWS. In this pipeline, we will create lambda function, rule in Amazon Event Bridge, a task, etc. To make it easy for you, we have given a template below which will automatically deploy everything and setup a task with 10 minute frequency (please change as required) of writing log files to the selected S3 bucket. In this page, we will showcase the process for VPC and hence, we will use the vpc template. Please follow the steps below :
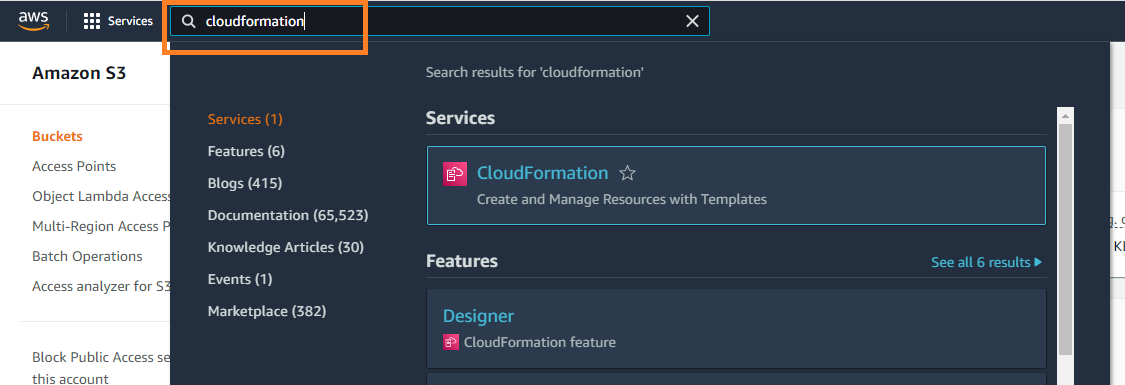
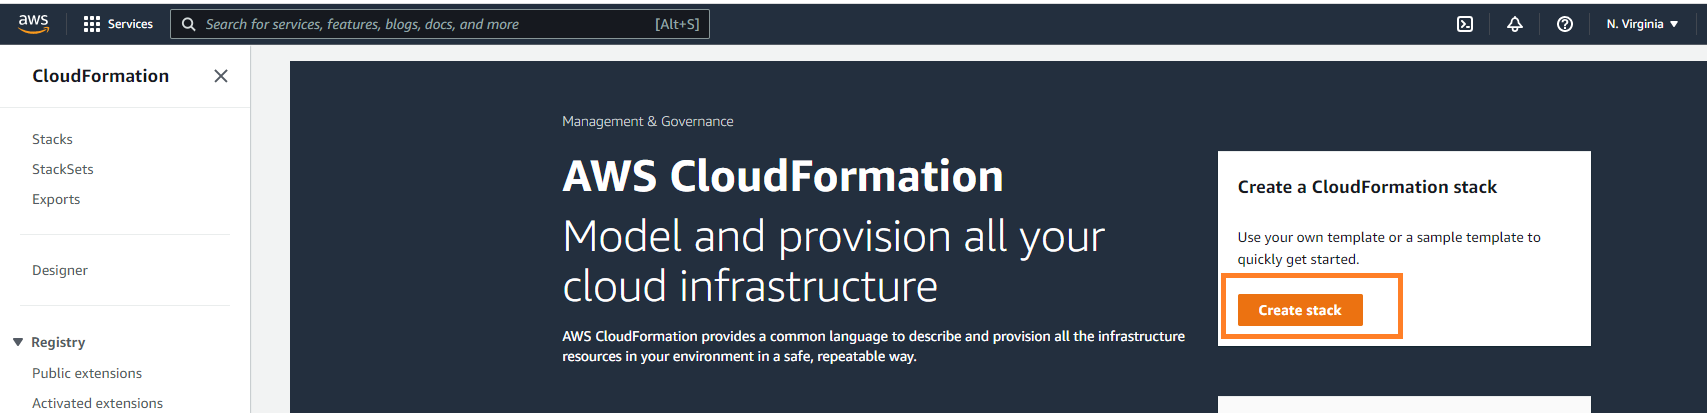
Navigate to the cloudformation console.
Choose the option to create stack.
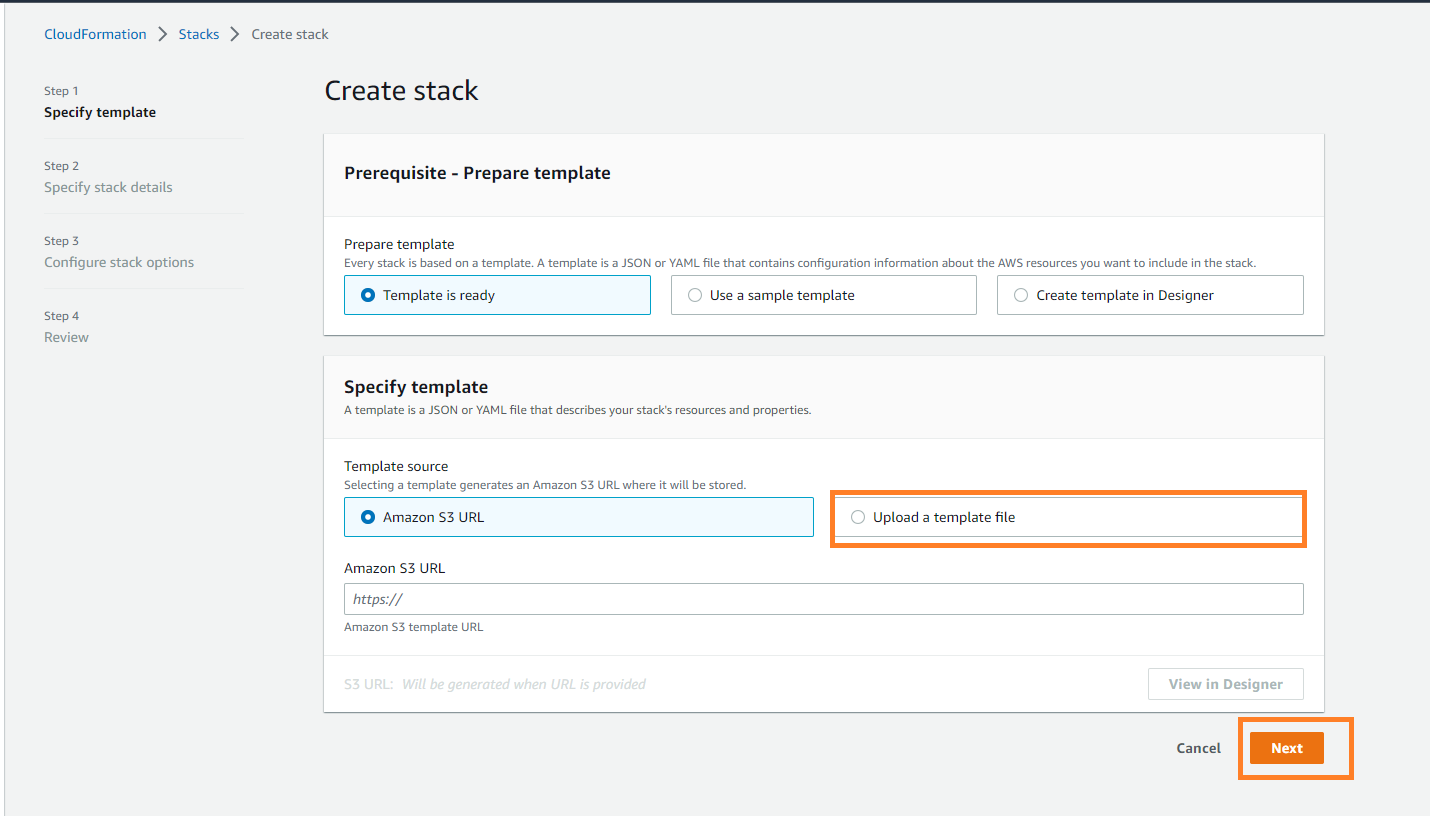
Choose the option to create stack using "upload a template file" option and attach this Template file
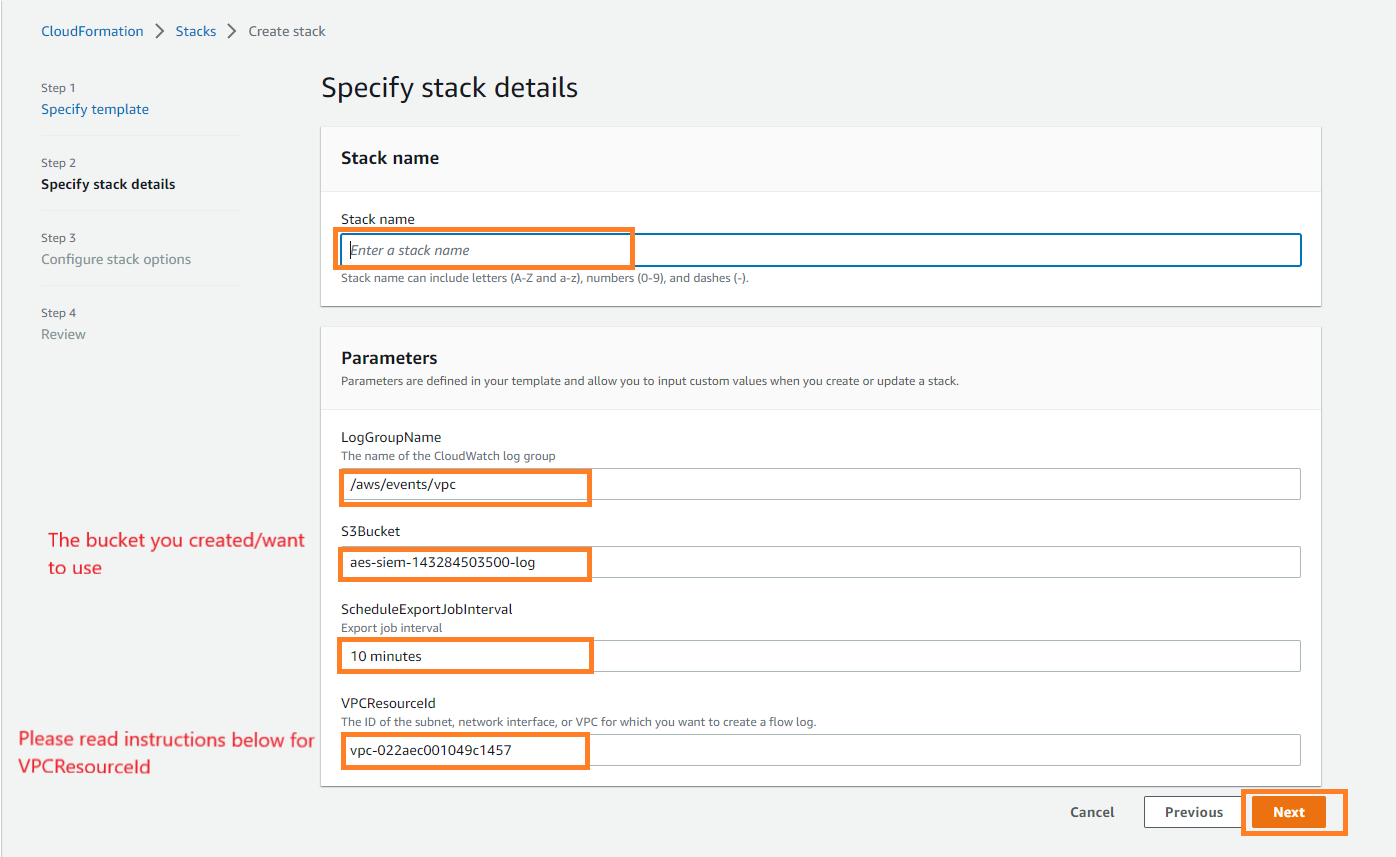
You will be asked for multiple parameters (prepopulated by template) which you need to input/change. You can change the name of the S3 bucket (as created above). You can set the ScheduleExportJobInterval to the desired frequency of data collection.
Note: The region of the S3 bucket and the stack should be the same. All services ask for 3 parameters expect VPC where you need to enter the ID (VPCResourceID) of VPC you want to monitor. Please follow the instructions below to get the VPC ID.
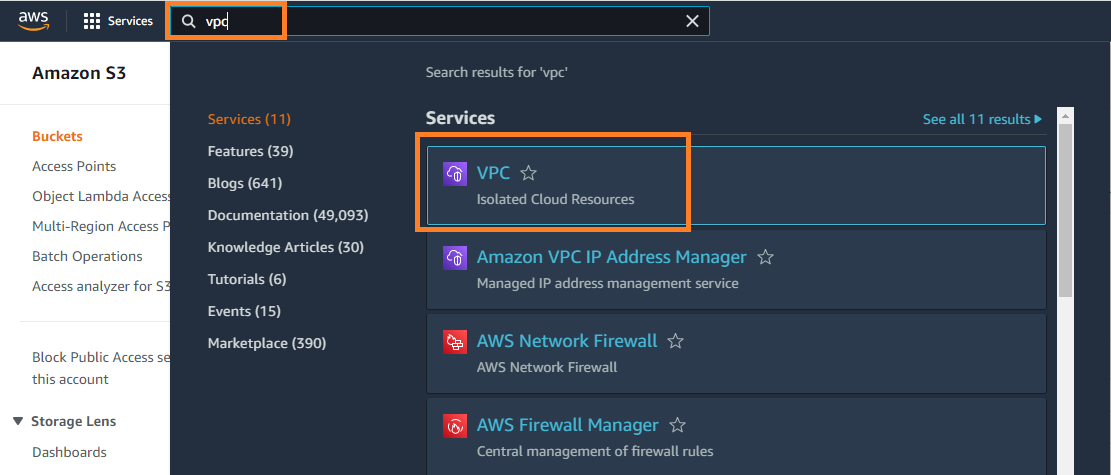
For VPCResourceID, we need to navigate to the VPC service page.
Click on the VPCs (see all Regions).
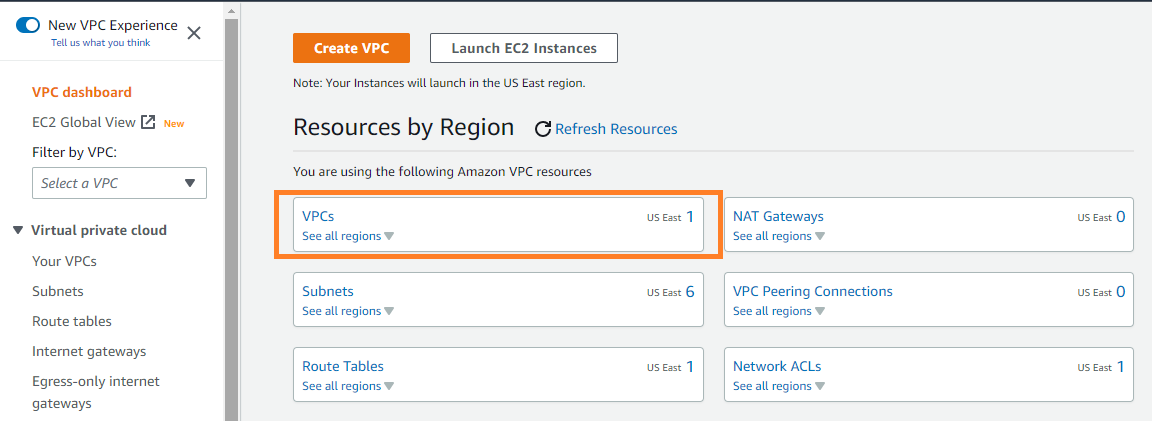
You can use the vpcresourceid (as highlighted below) for the parameter in cloud formation.

Now proceed to the next step for cloud formation and use all default options to proceed to next step. Here you need to select the checkbox to finally create the stack.
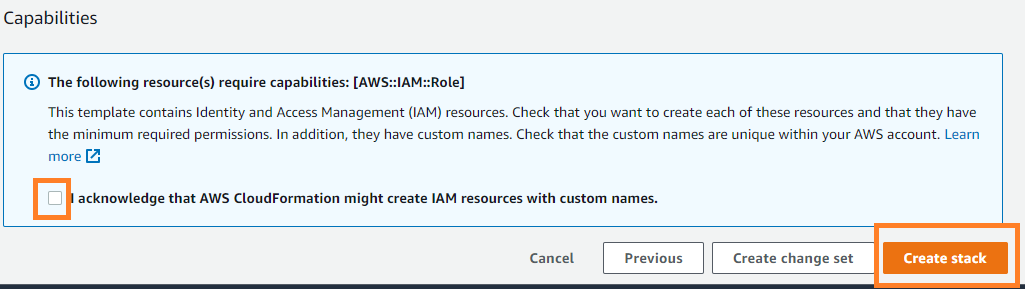
This will initiate the deployment process of the stack and it will setup and activate the whole collection pipeline. As an outcome, it will start writing the data logs for the above VPC resource every 10 minutes to the mentioned S3 bucket. It will take probably a couple of minute for the setup to be complete.
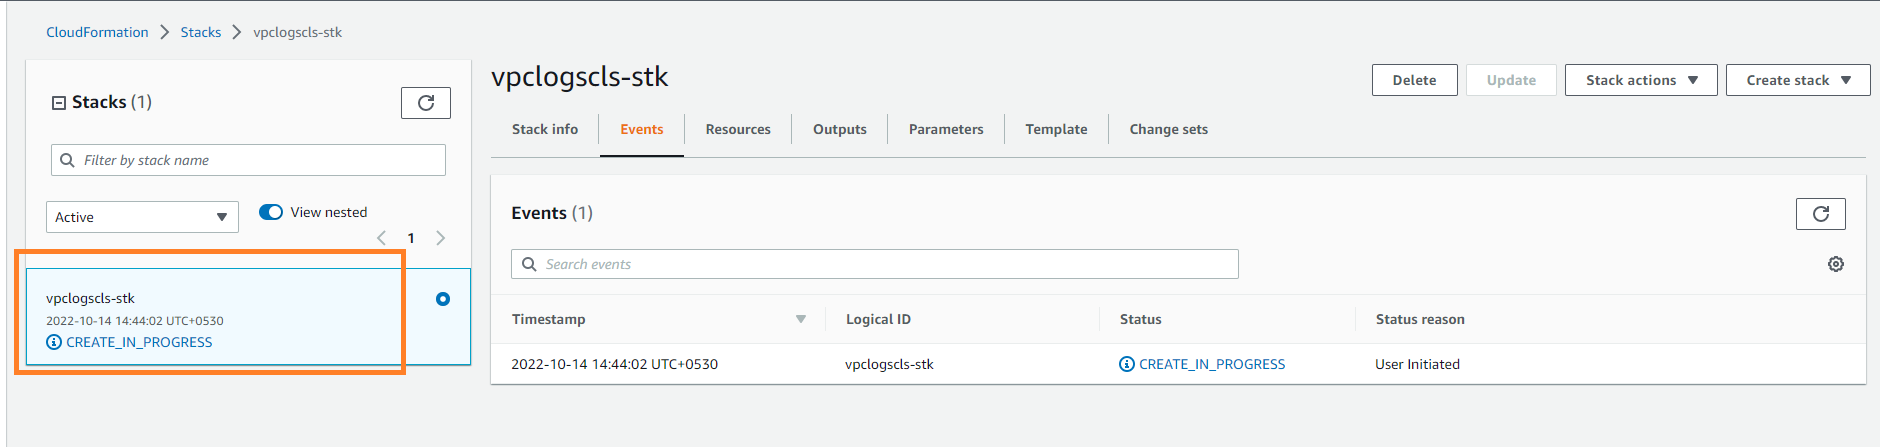
As per the schedule chosen (10 minutes default), you will be able to see the data in S3 bucket.
In the bucket you will be able to see individual folders for each service.
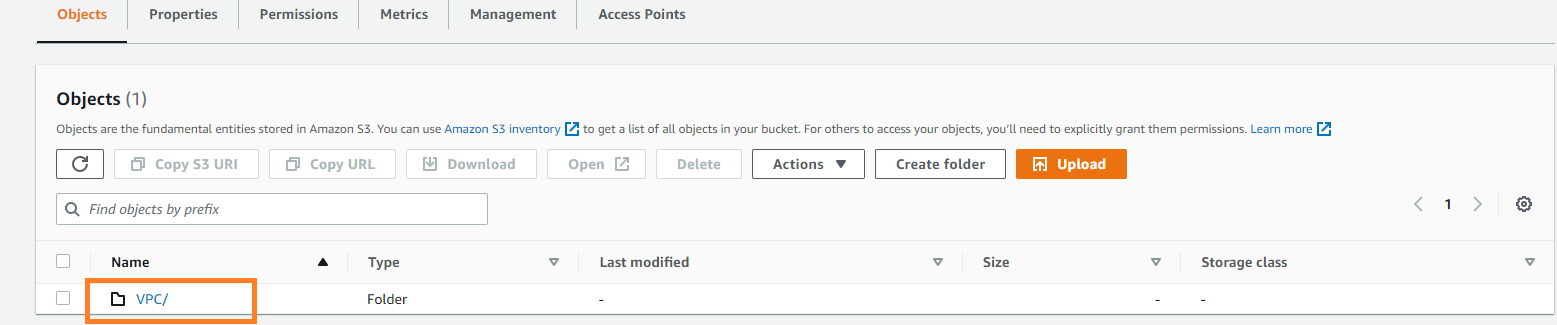
Similarly you can follow the above process with respective templates to enable the data collection for other sources. The log data will be written to the same S3 bucket with subfolders for each service deployed automatically.
This page will cover all the components needed in snowflake to operationalize the pipeline.
Storage Integration between Snowflake and AWS
Snowflake has provided very comprehensive documentation to set up this storage integration. In our case, we need to create one storage integration for the whole bucket. Taking Snowflake documentation as reference, we have given the steps required for storage integration below.
Step 1 : Creating an IAM Policy
The following step-by-step instructions describe how to configure access permissions for Snowflake in your AWS Management Console so that you can use an S3 bucket to load and unload data:
- Log into the AWS Management Console.
- From the home dashboard, choose Identity & Access Management (IAM):

- Choose Account settings from the left-hand navigation pane.
- Expand the Security Token Service Regions list, find the AWS region corresponding to the region where your account is located, and choose Activate if the status is Inactive.
- Choose Policies from the left-hand navigation pane.
- Click Create Policy:
- Click the JSON tab.
- Add a policy document that will allow Snowflake to access the S3 bucket and folder. You can use the below policy. You would need to replace the bucket name with your AWS bucket name.
{
    "Version": "2012-10-17",
    "Statement": [
        {
            "Effect": "Allow",
            "Action": [
              "s3:PutObject",
              "s3:GetObject",
              "s3:GetObjectVersion",
              "s3:DeleteObject",
              "s3:DeleteObjectVersion"
            ],
            "Resource": "arn:aws:s3:::<bucket>/*"
        },
        {
            "Effect": "Allow",
            "Action": [
                "s3:ListBucket",
                "s3:GetBucketLocation"
            ],
            "Resource": "arn:aws:s3:::<bucket>",
            "Condition": {
                "StringLike": {
                    "s3:prefix": [
                        "*"
                    ]
                }
            }
        }
    ]
}
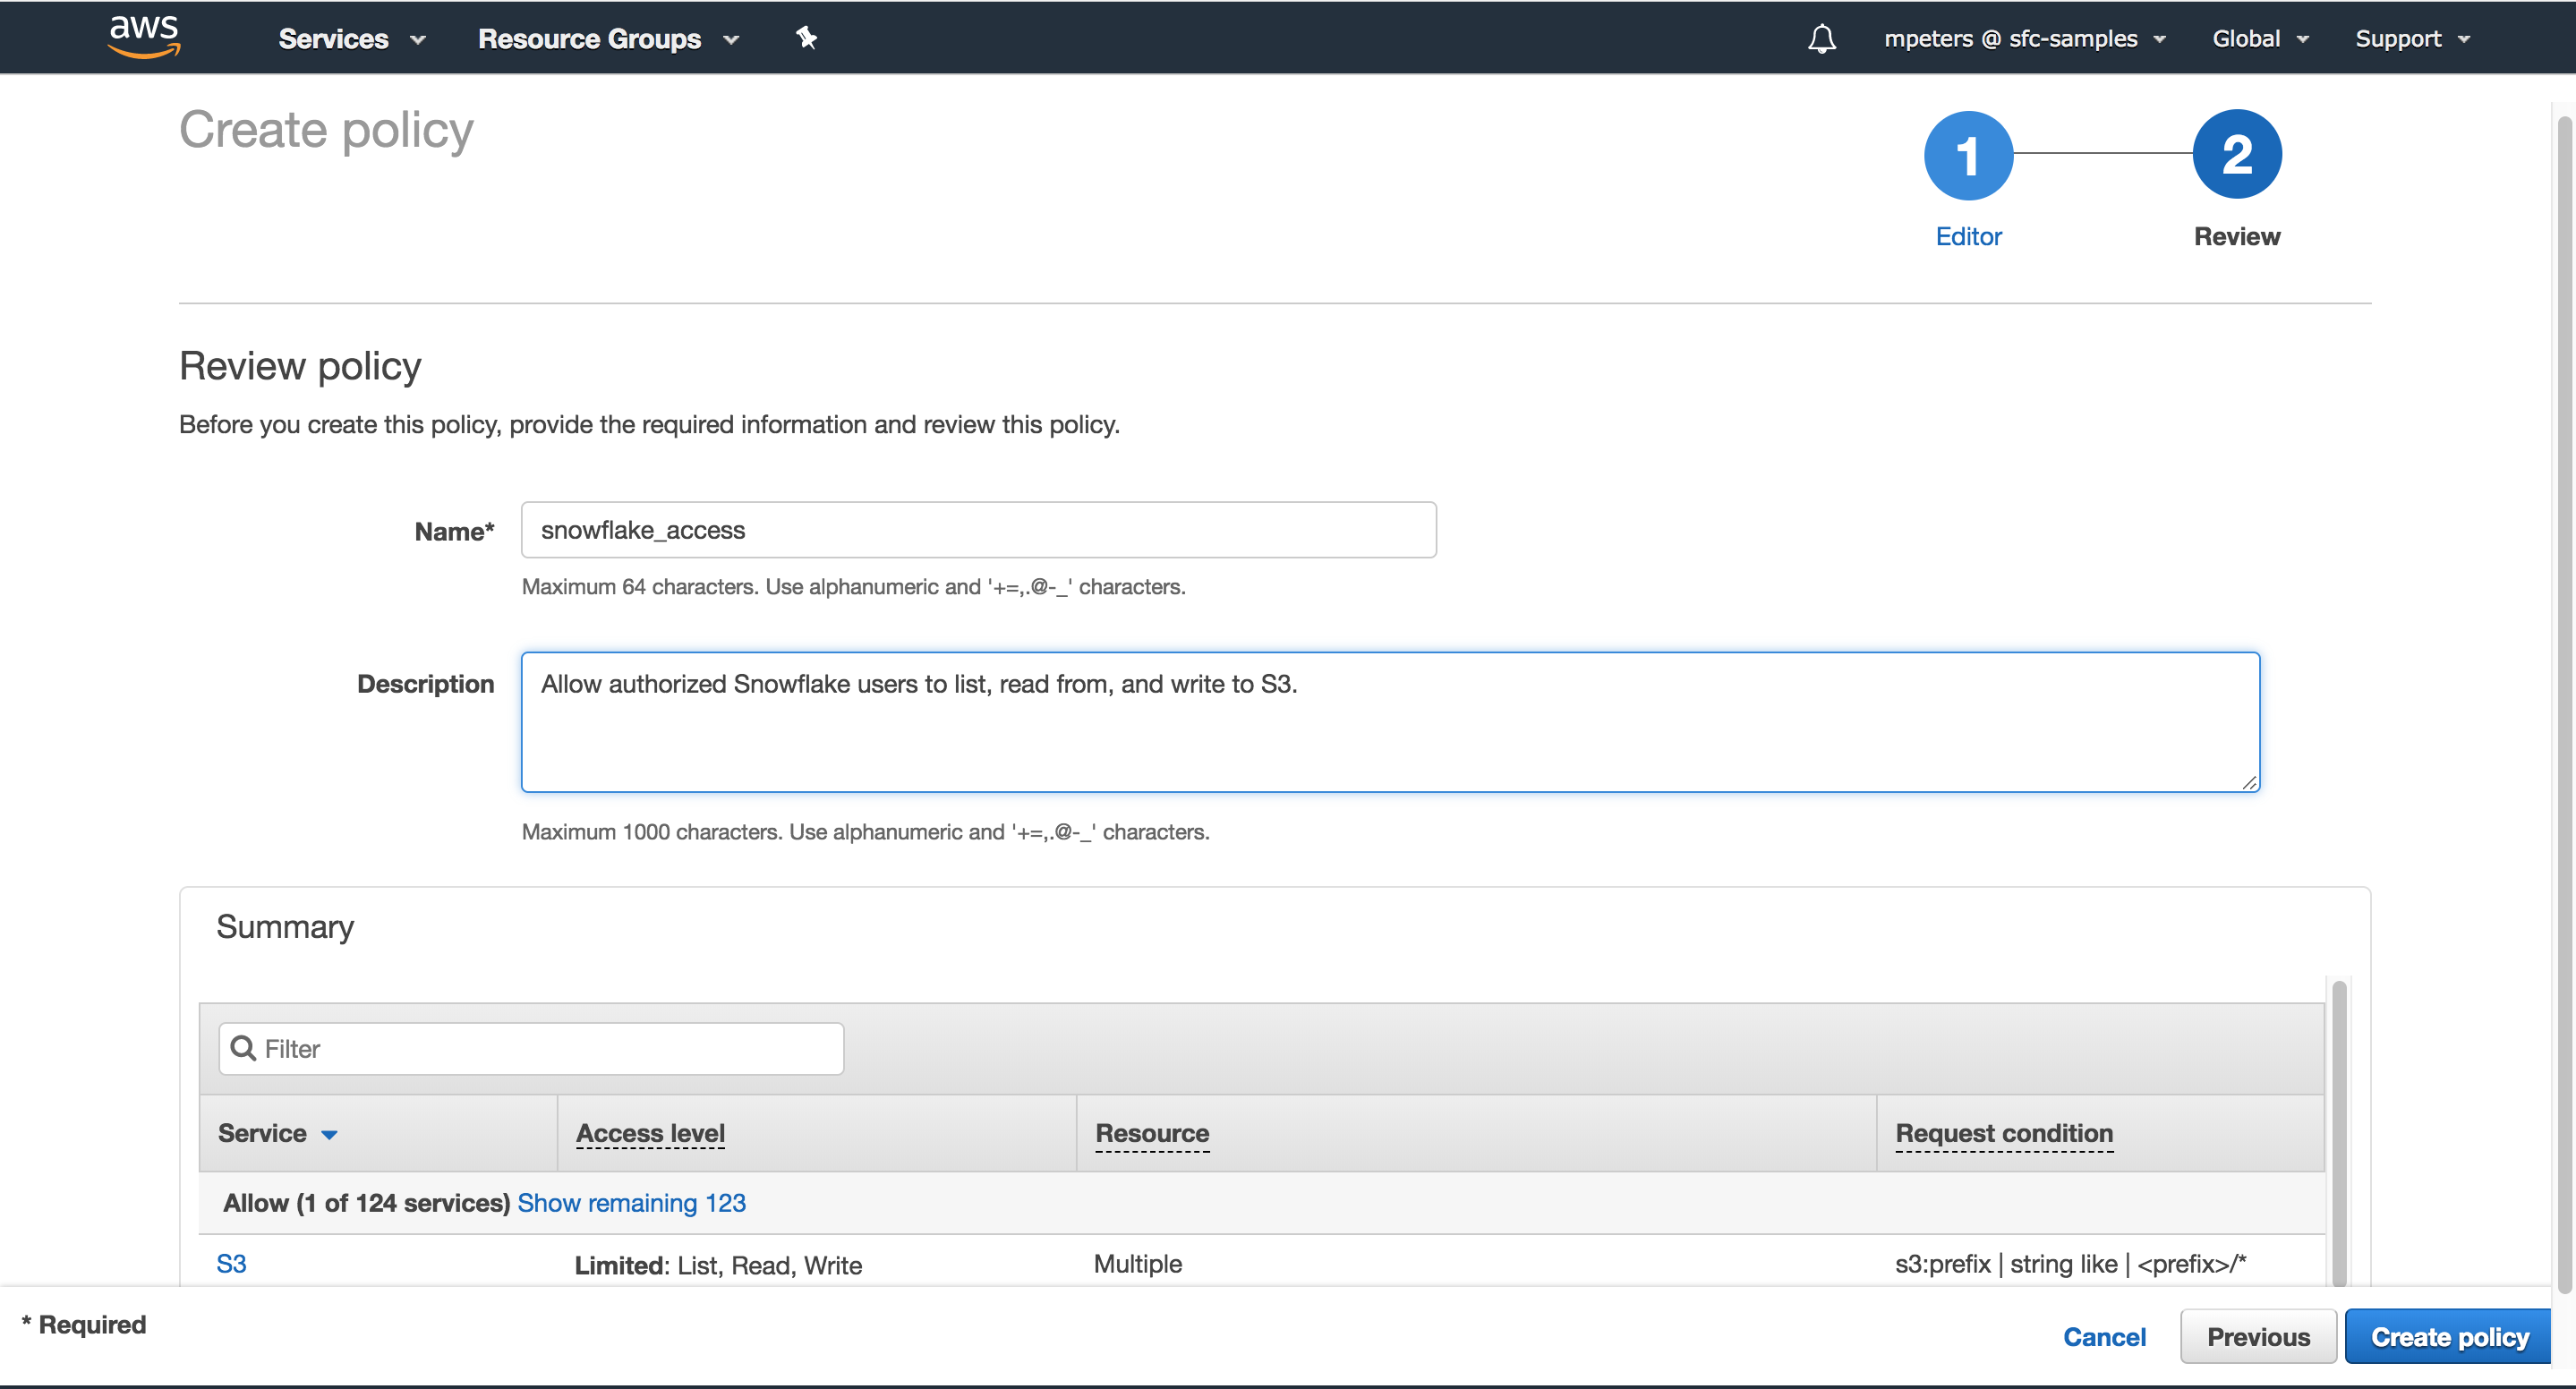
- Click Review policy.
- Enter the policy name (e.g. snowflake_access) and an optional description. Click Create policy.
Step 2: Create the IAM Role in AWS
In the AWS Management Console, create an AWS IAM role to grant privileges on the S3 bucket containing your data files.
- Log into the AWS Management Console.
- From the home dashboard, choose Identity & Access Management (IAM):
- Choose Roles from the left-hand navigation pane.
- Click the Create role button.
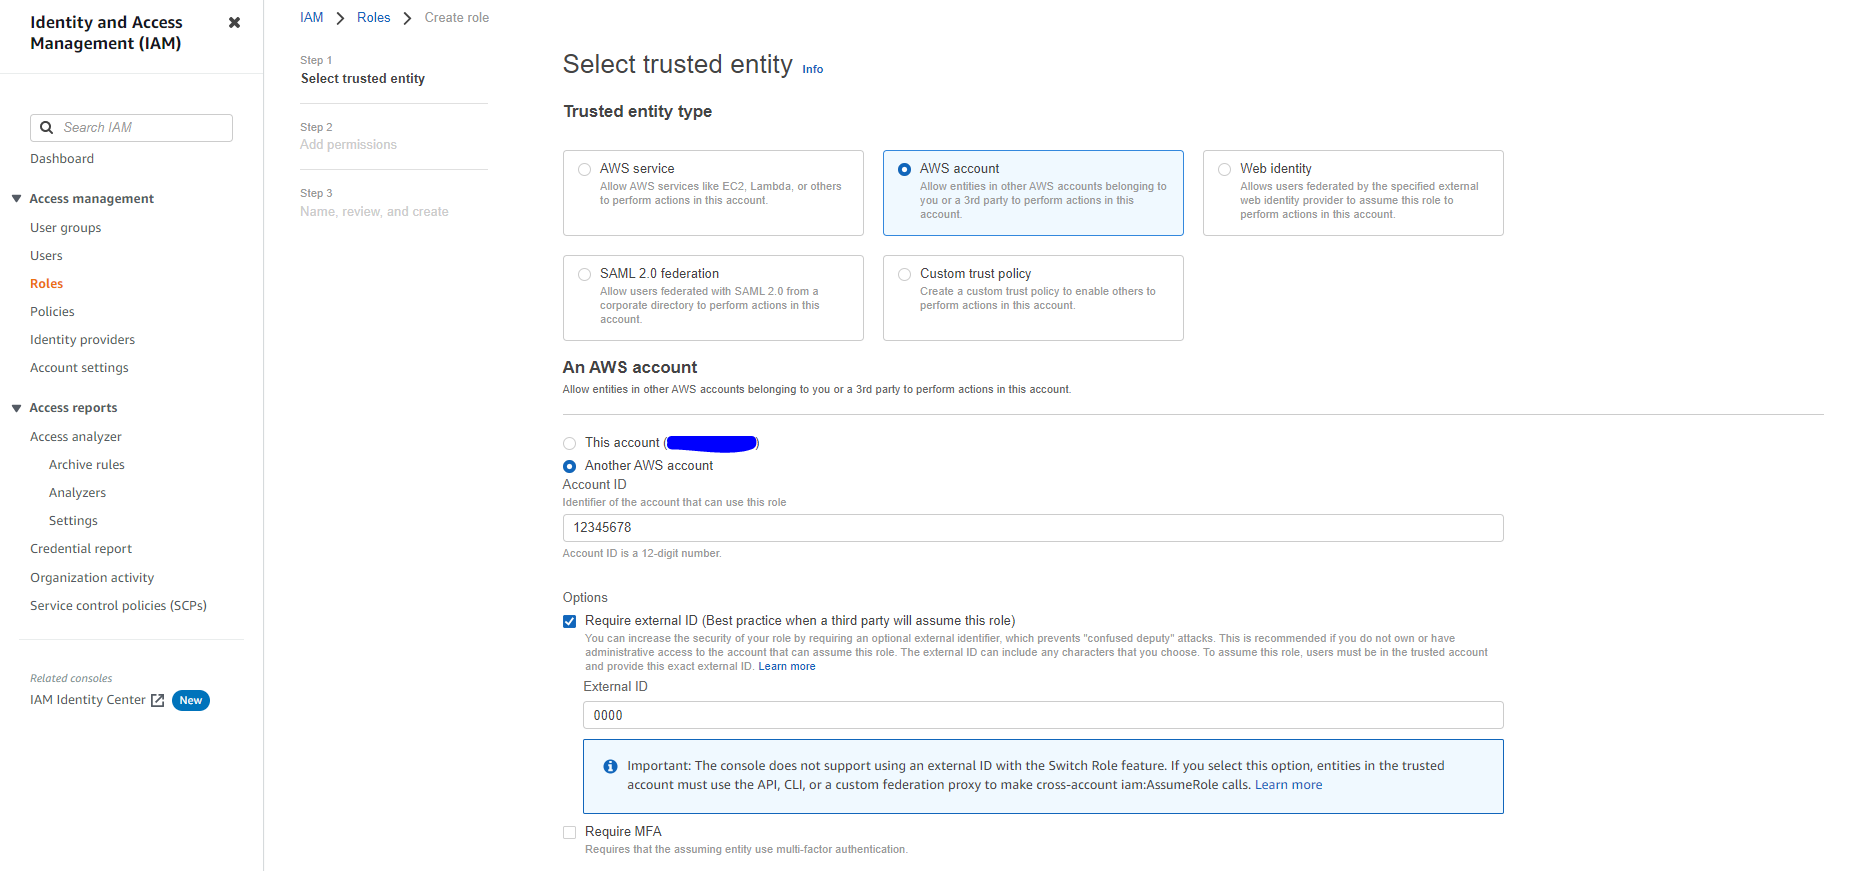
- Select Another AWS account as the trusted entity type.
- In the Account ID field, enter your own AWS account ID temporarily. Later, you will modify the trusted relationship and grant access to Snowflake.
- Select the Require external ID option. Enter a dummy ID such as 0000. Later, you will modify the trusted relationship and specify the external ID for your Snowflake stage. An external ID is required to grant access to your AWS resources (i.e. S3) to a third party (i.e. Snowflake).
- Click the Next button.
- Locate the policy you created in Step 1, and select this policy.
- Click the Next button.
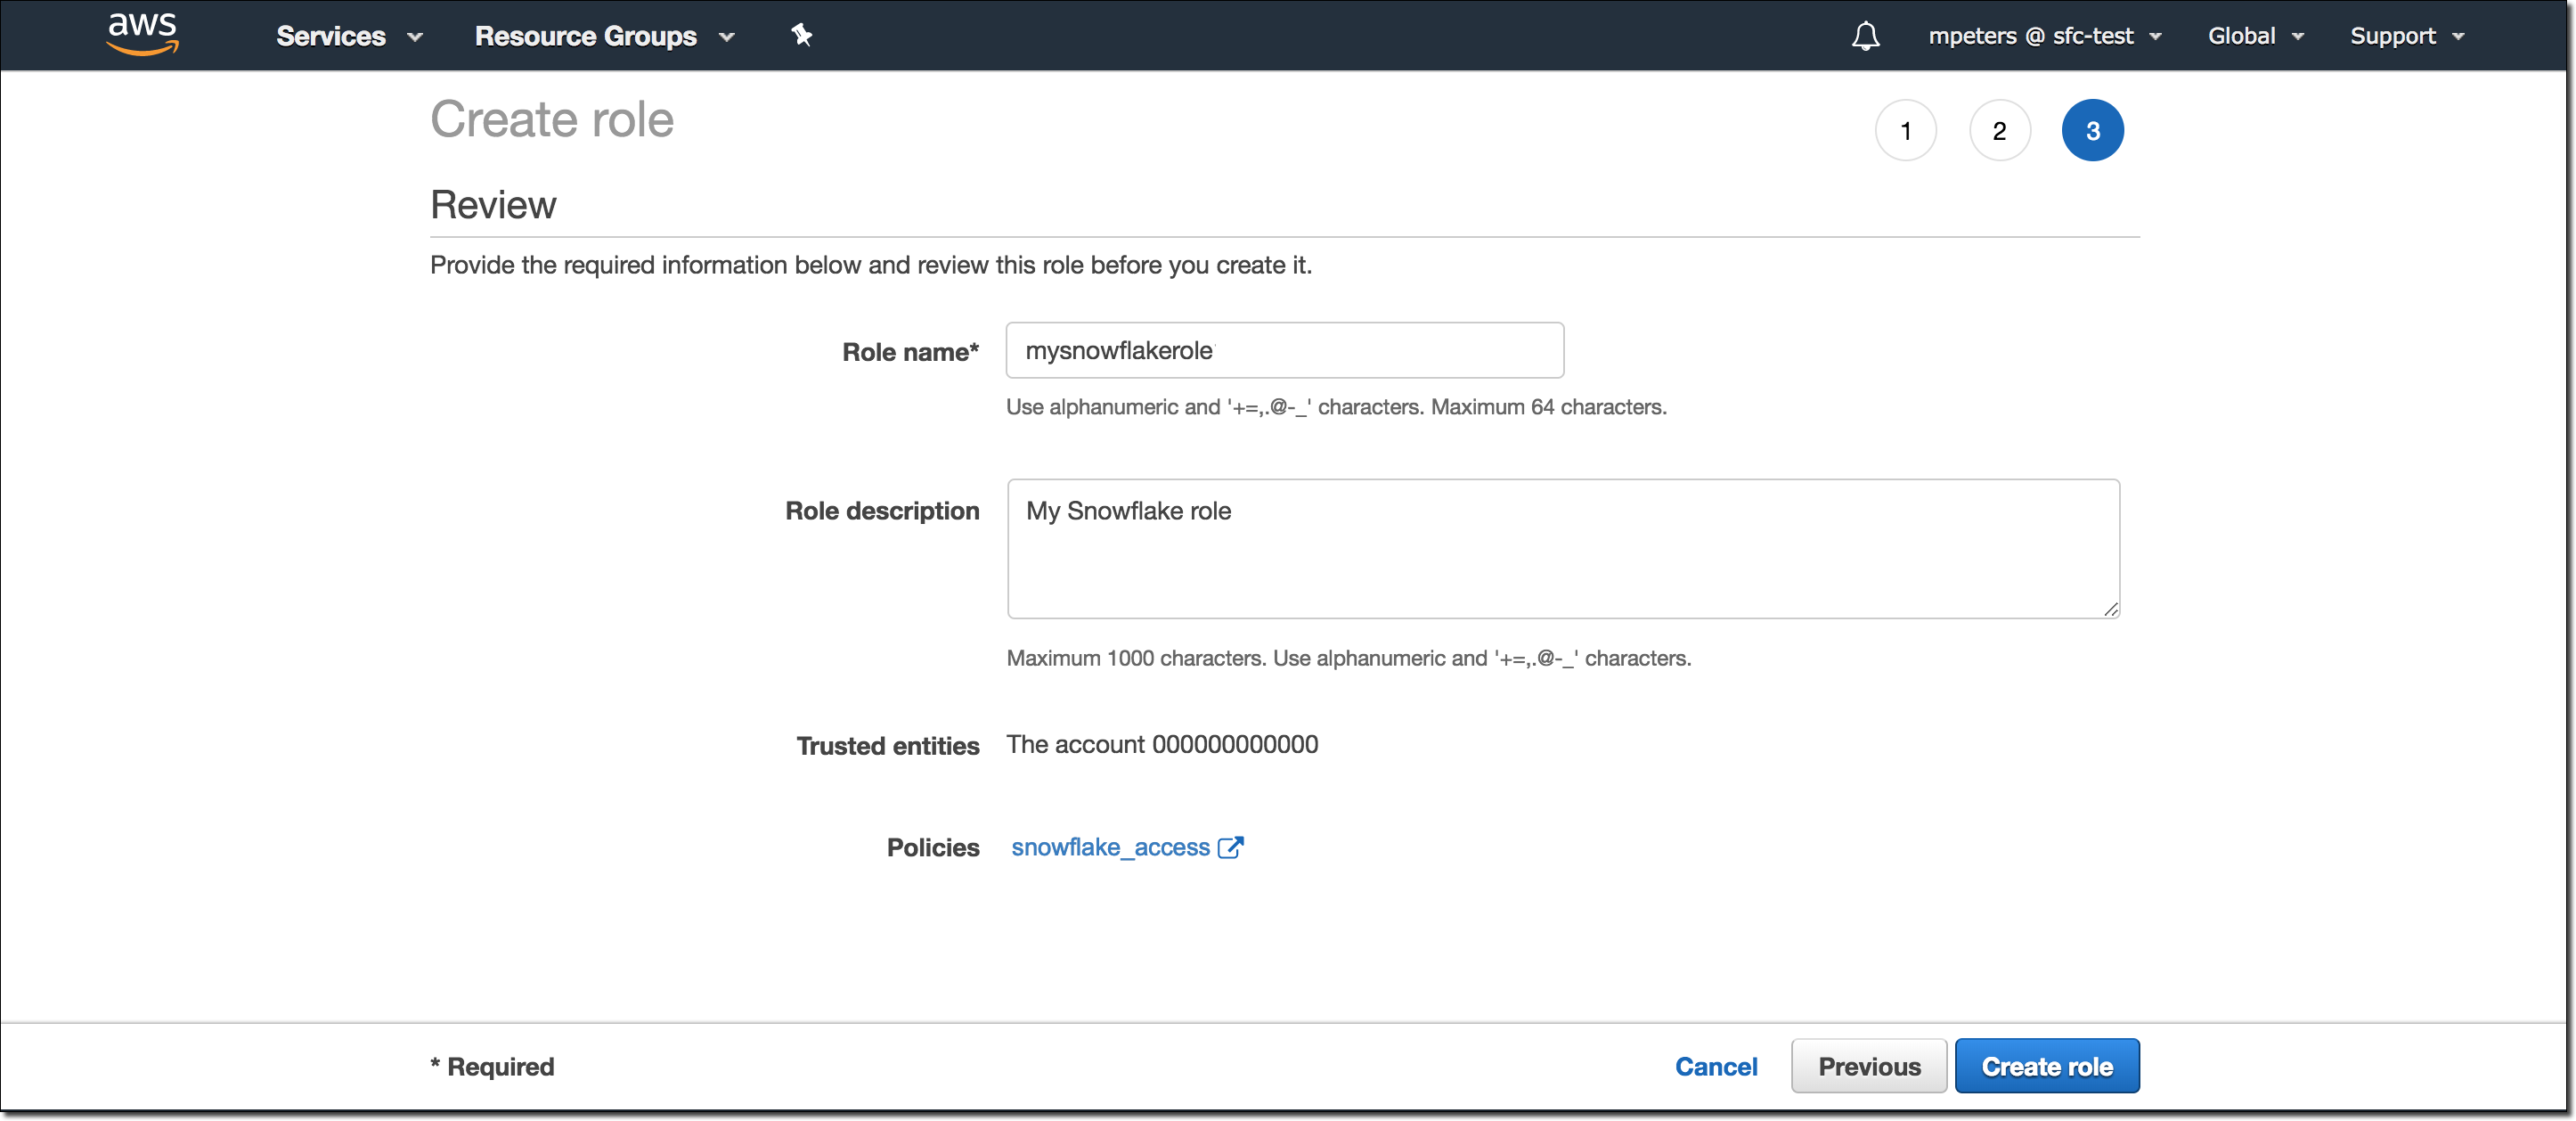
- Enter a name and description for the role, and click the Create role button. You have now created an IAM policy for a bucket, created an IAM role, and attached the policy to the role.
- Record the Role ARN value located on the role summary page. In the next step, you will create a Snowflake integration that references this role.
Step 3: Create a Cloud Storage Integration in Snowflake
Create a storage integration using the CREATE STORAGE INTEGRATION command given below. You need to change the storage_aws_role_arn and storage_allowed_locations in the command. For storage_aws_role_arn, you need to use the role arn recorded in the last step and for storage_allowed_locations, you need to put in the name of the bucket created in the last step.
create or replace storage integration AMZ_AWS_SF
  type = external_stage
  storage_provider = 'S3'
  enabled = true
  storage_aws_role_arn = 'arn:aws:iam::4444444444:role/cf-trial-role',
  storage_allowed_locations = ('s3://cf-demo/');
You need to also grant the usage permission of storage integration to the sysadmin snowflake role by executing the following command.
GRANT USAGE ON INTEGRATION AMZ_AWS_SF TO ROLE SYSADMIN;
Step 4: Retrieve the AWS IAM User for your Snowflake Account
- Execute the DESCRIBE INTEGRATION command to retrieve the ARN for the AWS IAM user that was created automatically for your Snowflake account:
DESC INTEGRATION AMZ_AWS_SF;
- Record the following values: STORAGE_AWS_IAM_USER_ARN and STORAGE_AWS_EXTERNAL_ID.
Step 5: Grant the IAM User Permissions to Access Bucket Objects
The following step-by-step instructions describe how to configure IAM access permissions for Snowflake in your AWS Management Console so that you can use a S3 bucket to load and unload data:
- Log into the AWS Management Console.
- From the home dashboard, choose Identity & Access Management (IAM):
- Choose Roles from the left-hand navigation pane.
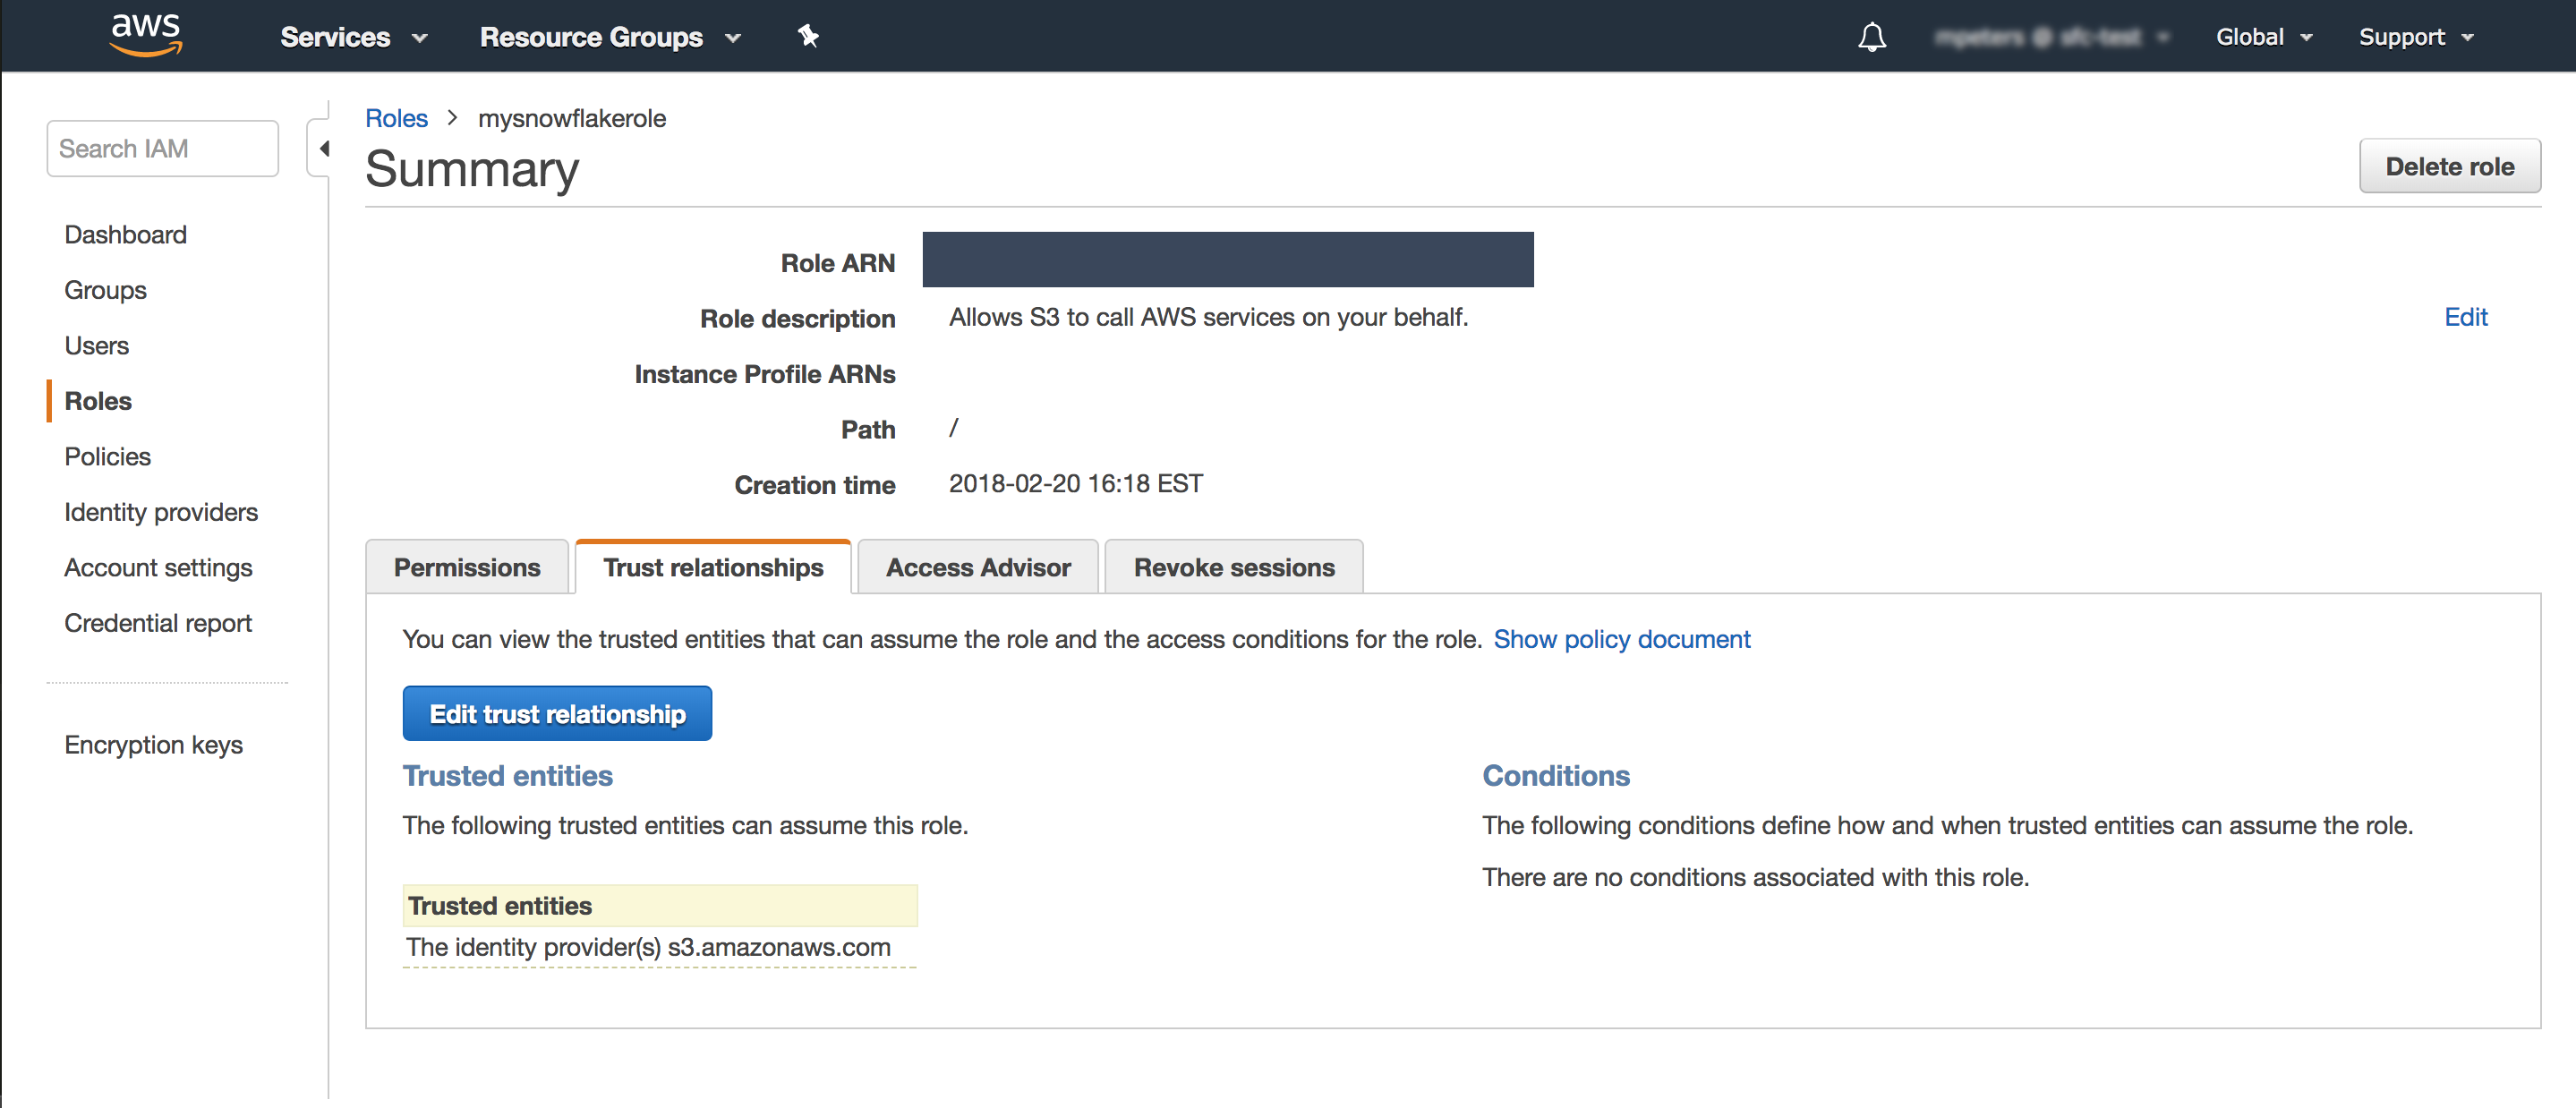
- Click on the role you created in Step 2.
- Click on the Trust relationships tab.
- Click the Edit trust relationship button.
- Modify the policy document with the DESC STORAGE INTEGRATION output values you recorded in Step 4.
Policy document for IAM role
{
  "Version": "2012-10-17",
  "Statement": [
    {
      "Sid": "",
      "Effect": "Allow",
      "Principal": {
        "AWS": "<snowflake_user_arn>"
      },
      "Action": "sts:AssumeRole",
      "Condition": {
        "StringEquals": {
          "sts:ExternalId": "<snowflake_external_id>"
        }
      }
    }
  ]
}
Where snowflake_user_arn is the STORAGE_AWS_IAM_USER_ARN value you recorded and snowflake_external_id is the STORAGE_AWS_EXTERNAL_ID value you recorded.
Note : For security reasons, if you create a new storage integration (or recreate an existing storage integration using the CREATE OR REPLACE STORAGE INTEGRATION syntax), the resulting integration has a different external ID and so it cannot resolve the trust relationship unless the trust policy is modified.
- Click the Update Trust Policy button. The changes are saved.
With this, you have completed the setup of the storage integration. We now move ahead to the snowflake pipeline setup.
Snowflake Data Ingestion Pipeline
So now we have our logs sitting in our S3 bucket, and we have also created an integration between Snowflake and S3 bucket. The next step is to set up the data ingestion pipeline in snowflake to store and parse all the data in snowflake.
You can use this SQL file and copy all the contents of the file in a new worksheet, and you would need to change two things (the name of storage integration and the path to the S3 bucket) in the create stage command in the file. Please execute all the commands by selecting all the commands and running them together (Ctrl + enter). At the end of it, you will have ODM views created and showing data generated from AWS.
Note: It takes a few minutes for data to load and show up in view after the execution of all commands has finished.
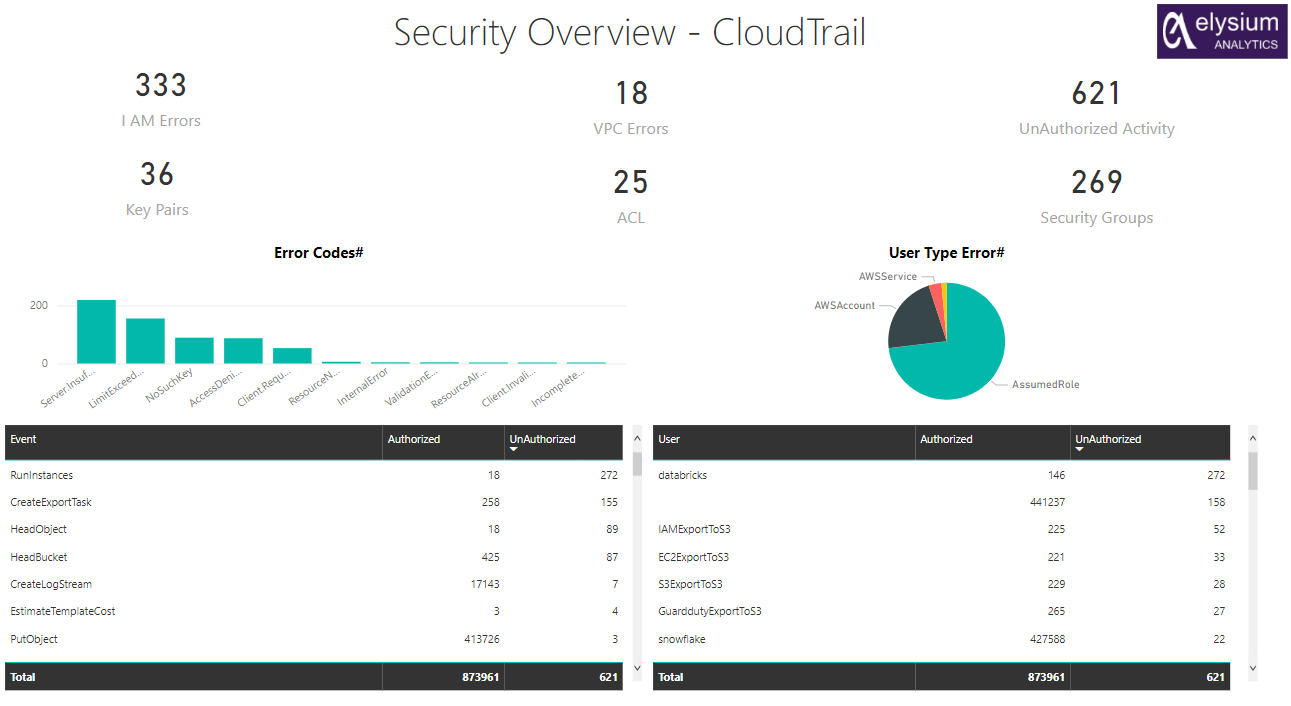
To demonstrate the ease and high add on value of downstream consumption of data through ODM ,we have created multiple usecases in various BI tools
PowerBI: Being a strong and much popular BI tool, we have created a dashboard on the cloudtrail data by using the ODM to high various trends and interestingmetrics which can guide us for further investigations on abnormal/risky behaviour.
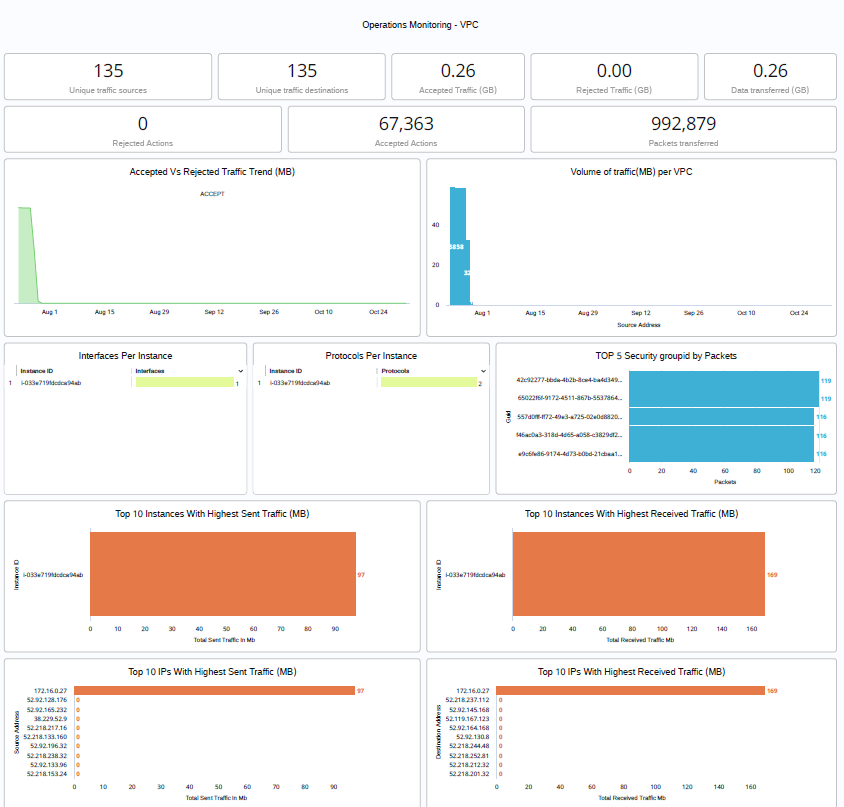
Looker: We have also deployed a dashboard on the VPC log data using the ODM to easily monitor the trends and metrics which can help up take prompt actions on various problems.
Elysium Analytics is an advanced analytics solution built on the same ODM structure data in Snowflake. We make building a semantic security data lake easy with our open data model for contextual and deep analytics. We also provide the prebuilt search and analytics applications you need to get immediate value from your data. Our cloud-native semantic data lake with an open data model enables organizations to perform contextual analytics and perform a full-text search across all data sources. Our data model connects the dots across all telemetry, allowing deep analytics, alerting, and visualization in a single pane of glass for better detection and investigation productivity. We onboard your telemetry and handle the data mapping for you.
Let's demonstrate how an enterprise organization achieves better detection through the adoption of modern platforms such as Snowflake. In this example, an enterprise is running a mission-critical AWS env for e-commerce transactions. To ensure the application is secured, the enterprise has deployed Elysium Analytics to collect the data with prebuilt data connectors. The demo video shows an analyst receiving emails from Elysium Analytics and begins investigating the alert notification regarding an unusual remote desktop app installed on a laptop.
To book a demo, the Client form can be accessed here: Fill the form
For Elysium Sales related inquiries: sales@elysiumanalytics.ai
You can watch through various Elysium product demo videos Elysium Analytics Walkthrough Demo